This article will focus on How to Install and Configure Git in easy steps?
What is Git?
Git is one of the most popular version control systems. It is a free and open source software to manage a source code repository. It is a DevOps tool which helps the software development team to track the changes and collaborate with team members to make development life easier.
Official Website Link of Git – https://github.com/
Git and Git-Hub
Git is a source code repository software that let you track your changes. On the other side, Github is a cloud-based service which manages Git repositories.
How to install Git in Windows?
To install Git for Windows follow the below steps –
- Go to GitHub and then log in with your existing account or create a new account using the signup link.
- Download Git for Windows from this link – https://git-scm.com/downloads

3. Click on next

4. Change the default editor to Notepad++

5. Next, Change this default console window. Rest all selection on every step will be the default.

How to Configure Git?
Once the Git for Windows installation is done it is time to configure the Git.
- Open the command prompt and type the below 2 commands, first –
git config --global user.name "gituser1"Second command –
git config --global user.email "gituser@dmain.com"- Go to github.com and create a new repository.

- From add .gitignore search for Visual Studio and then select Visual Studio from the list.

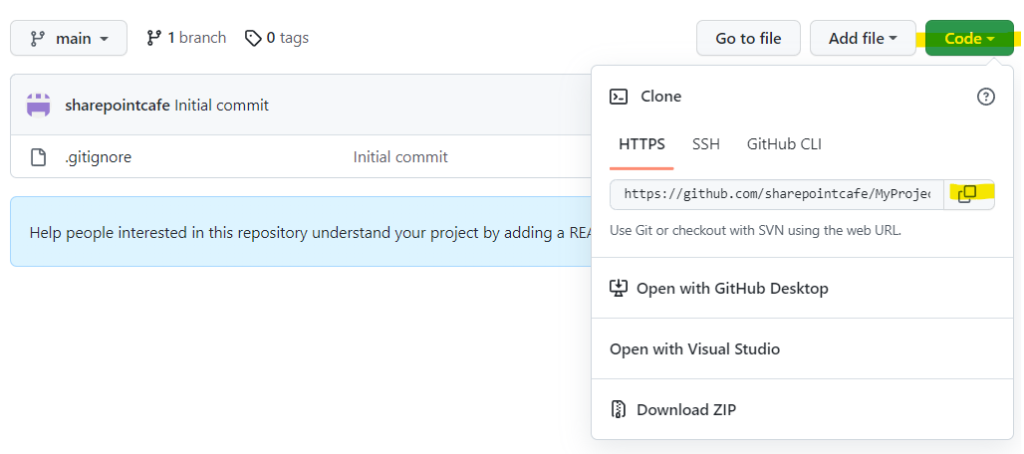
- Click on Code and then copy the Web URL.

- Create a folder in your system Go to Windows Command Terminal and then type the below command.
c:/NET6> git clone <paste the Git Web URL copied in previous step>- Now create a .NET 6 project in Visual Studio 2022 in this location C:/NET6. Suppose the project name is ProjectDemo.
- Then use the below 3 commands to add, commit and push code changes and new projects to the Git repository.
c:/NET6/ProjectDemo> git add .
c:/NET6/ProjectDemo> git commit -m "InitialFiles"
c:/NET6/ProjectDemo> git push
Now, go to your GitHub link and you will see the project folders and files available there.

Git with Visual Studio
Earlier in this article, we have seen how to push, and commit the change to Git via command prompt. If you are comfortable doing it via command prompt you may continue.
However, we can do the same job via Visual Studio as well.
Open Visual Studio, you may see the Git Changes tool on the right side of Visual Studio. Open the Git Changes tool and you will a list of Files you have modified.
Write your comment and click on Commit All to commit the changes.

Next, click on the Push button (As shown in the below image) to send changes to the Git repository.

Summary
Git is an open-source and popular source code repository software. In this article, we have learned How to install and configure the Git repository in the Windows system. Also, we have used some of the basic commands to add, push and commit the changes.
