In this blog, we will see How to secure ASP.NET Core Web API using API Key Authentication. Although there are many ways to secure the web API, here we will discuss API key-based authentication.
What is API?
Web API is the Microsoft open-source technology for developing REST services based on HTTP protocol. ASP.Net Web API is a framework for building, and consuming HTTP-based services. The advantage of Web API is that it can be consumed by a wide range of clients like web browsers and mobile applications.
How to secure an API?
Security is the main aspect of developing a web API because it is available to the outside world.
To secure an API we use Token based or API Key based authentication.
In this article, we will see API key-based authentication in detail.
API Key-based Authentication
API key-based authentication will create a secure communication line between the client and API endpoints.
We will see 2 ways to implement API key-based authentication in this article.
- Action Filter – This mechanism will allow authorization by decorating the controller class or specific action method within the controller class.
- Custom Middleware – A custom middleware in .NET Core can be created and this will apply to all action methods in all controller classes within that project.
API Key-based authentication by Action Filter
To apply API-key-based authentication via the Action filter, the very first thing is to create a new class file.
Name this class MyApiKeyAttribute.cs and write the below code.
    [AttributeUsage(validOn: AttributeTargets.Class | AttributeTargets.Method)]
    public class MyApiKeyAttribute :   Attribute, IAsyncActionFilter
    {
        private const string APIKey = "SecureApiKey";
        public async Task OnActionExecutionAsync(ActionExecutingContext context, ActionExecutionDelegate next)
        {
            if (!context.HttpContext.Request.Headers.TryGetValue(APIKey, out var givenApiKey))
            {
                context.Result = new ContentResult()
                {
                    StatusCode = 401,
                    Content = "Unauthorize Access. Api Key was not provided"
                };
                return;
            }
            var appSettings = context.HttpContext.RequestServices.GetRequiredService<IConfiguration>();
            var apiKey = appSettings.GetValue<string>(APIKey);
            if (!apiKey.Equals(givenApiKey))
            {
                context.Result = new ContentResult()
                {
                    StatusCode = 401,
                    Content = "Unauthorize Access. Api Key is Invalid"
                };
                return;
            }

            await next();
        }
    }
You may notice that we have decorated the class with the below code snippet –
[AttributeUsage(validOn: AttributeTargets.Class | AttributeTargets.Method)]The above code snippet describes whether you want to apply this filter on a class level or method level or can be applied at both levels.
Next, add the below key in the appsettings.json file of your .Net Core API project
"SecureApiKey": "MyAPIKey123"
Once your MyApiKeyAttribute.cs file is ready. Go to your existing controller class or create a new controller class within your project. Decorate your controller class or action method within your controller class as below –
       [HttpGet]
        [Route("Test")]
        [MyApiKey]
        public string Test()
        {
            return "Hello";
        }
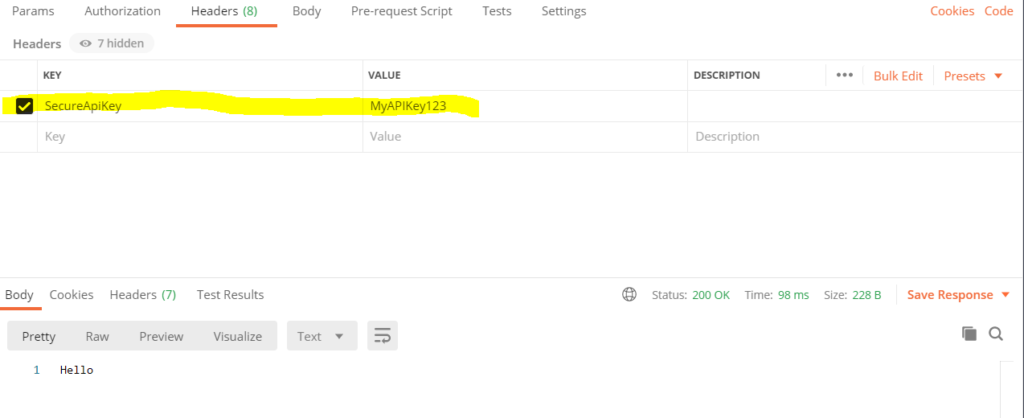
Now, we will access the action method from the Postman tool and will try different cases –
First Case – Do not pass the API Key and hit the API, we will get the below result.

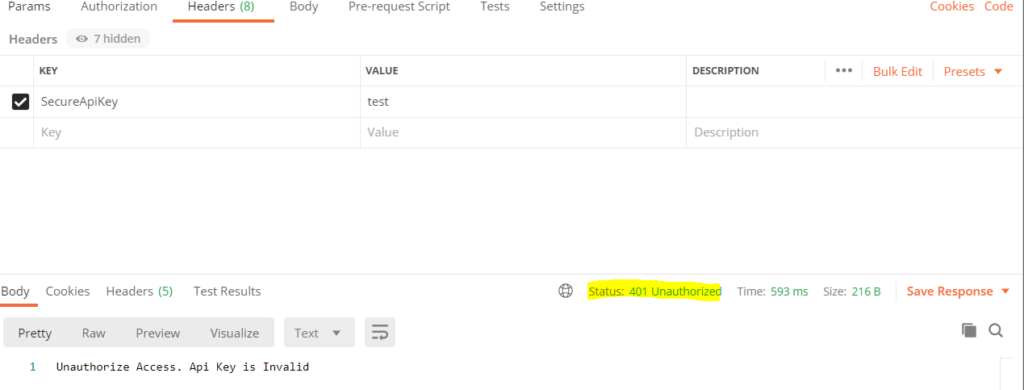
Second Case – Provide an invalid API Key


Apply API-key-based authentication using a Custom Middleware
So, we have implemented API key-based authentication and it works perfectly. Now, we will implement API-key-based authentication using Custom middleware in .NET Core.
What is Middleware in .NET Core?
Middleware in .NET Core is a component or piece of code that is written into an application pipeline to handle requests and responses. A middleware internally can pass the request to the next available middleware in the pipeline. Middleware can also perform tasks before and after a component in the pipeline. Read the full article here.
Create a custom middleware class
Create a class name it ApiKeyMiddleware.cs and write below code snippet.
 public class ApiKeyMiddleware
    {
        private readonly RequestDelegate _next;
        private const string APIKey = "SecureApiKey";
        public ApiKeyMiddleware(RequestDelegate next)
        {
            _next = next;
        }
        public async Task InvokeAsync(HttpContext context)
        {
            if (!context.Request.Headers.TryGetValue(APIKey, out
                    var extractedApiKey))
            {
                context.Response.StatusCode = 401;
                await context.Response.WriteAsync("Unauthorized Access. Api Key was not provided ");
                return;
            }
            var appSettings = context.RequestServices.GetRequiredService<IConfiguration>();
            var apiKey = appSettings.GetValue<string>(APIKey);
            if (!apiKey.Equals(extractedApiKey))
            {
                context.Response.StatusCode = 401;
                await context.Response.WriteAsync("Unauthorized Access. Invalid API Key");
                return;
            }
            await _next(context);
        }
    }
Add the below key in the appsettings.json file –
“SecureApiKey”: “MyAPIKey123”
Open the Startup.cs file and add the below line of code in the Configure() method
app.UseMiddleware<ApiKeyMiddleware>();Middleware will help us to apply custom API Key Middleware over every controller class automatically.
Try to run this API from the POSTMAN tool and you will get the desired output as we did earlier.
Summary
API Key-based authentication is one of the ways to secure the Web API communication channel.
In this article, we have seen What is API-Key-based authentication and how to implement this by applying attributes and using custom middleware.
Hope this article is helpful to you. Please write your suggestion in the comment box below and share this article within your tech group.
Happy Learning.

